I’m reaching why the GP patient’s data record essential, because the doctor needs to look at the patient illness history and medication record to help the doctor to identify, which types of prescription to give to the patient.
Ingeneral, the patient data used to improving health care services, develop new medication and prevent the disease.
Week 2
In this week my reach will focus on the GP petient data security policy (the minimum requirement to protect the patient data to earn the patient trust) such as
login passoword
Encription data
Antivirus
backup data and the system updated
Also consider latest network hardware such as routes, or firewall implement the security command to reduce the risk of the malicious attack.
I started to write analysis focus on investigation and network vulnerability
Week 3
I watched on you tube data protection training video by ICO, data day hygiene. They are strongly advise do not used memory stick to stored personal data , because it is easy to lost or misused unless the memory stick encrypted.
Also send personal data by fax without checking if the number was correct very high risk as well.
When you are sharing personal information with other organization must only information relevant the purpose and content should be disclosed.
furthermore, whey are explain how to dispose the personal information should be measured by appropriate technical, because If you are just deleted the hard drive that is not proper way and the data can be retrieve. I continuance with literature review
Week 4
Group project;
We had group project meeting during the session. the meeting focus individual task in the group project and we are scheduled time to handed individual task. I handed my own analysis to group project as the group leader requested.
Week 5
I started to write the individual project discussion
We had group project discuss the report tiles and setup Microsoft team to able to communicate essay
This is the first post on my new blog. I’m just getting this new blog going, so stay tuned for more. Subscribe below to get notified when I post new updates.
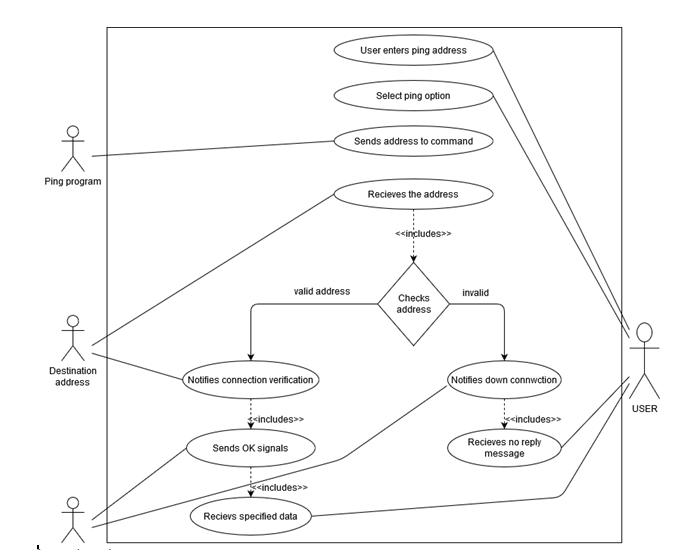
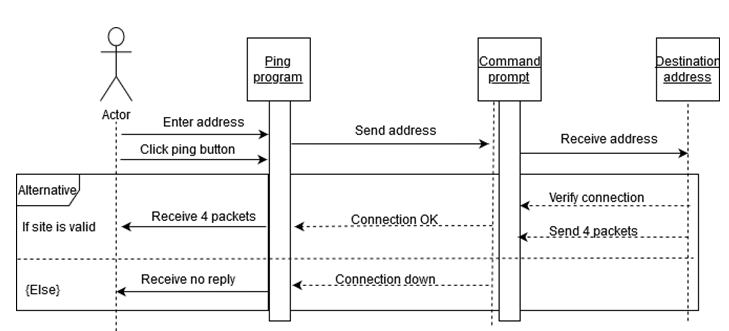
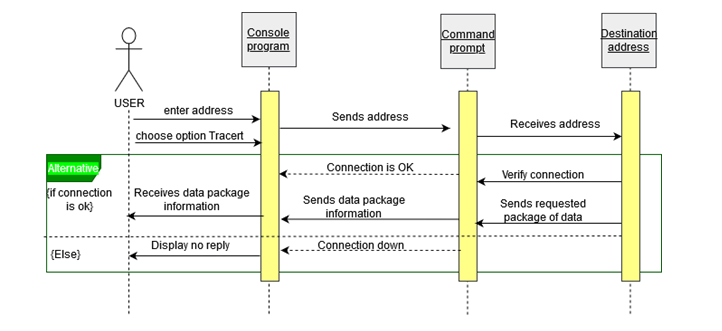
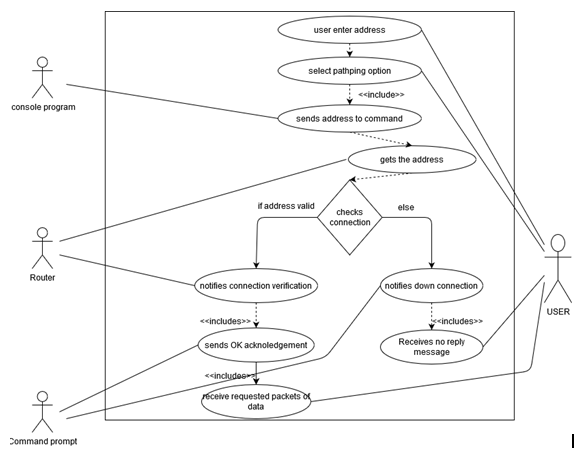
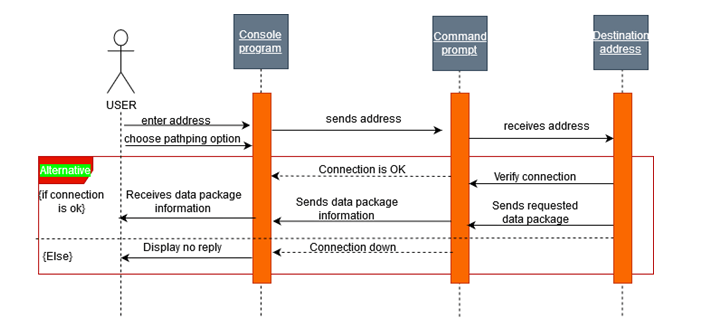
Entire path is pinged to test for live connections
Statics of IP address and ping result is displayed
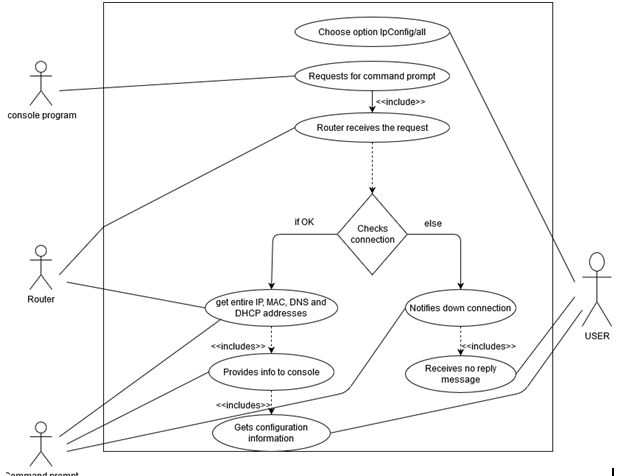
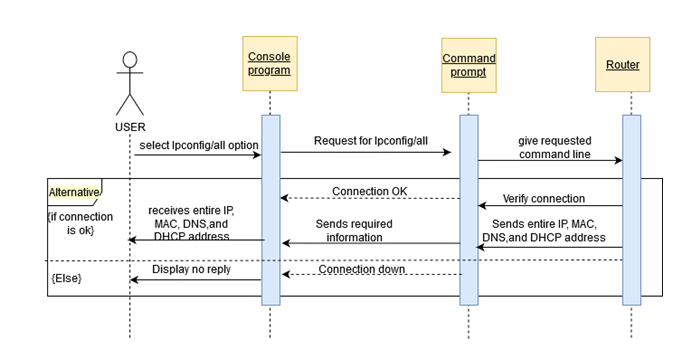
Modules required for making GUI application
import os
import tkinter as tk
Class definition
class Network_Application(tk.Frame):
# Init method for Class
def __init__(self, masterRoot=None):
super().__init__(masterRoot)
# defining various class settings
self.main = masterRoot
self.main.geometry("450x320")
self.winfo_toplevel().title("*** Run Network Commands ***")
self.add_UI_Components()
self.pack()
# function to add UI componets to root window
def add_UI_Components(self):
self.layer1 = tk.Frame(self) # initalizing a frame within a window
self.layer2blue=tk.Frame(self,pady=10)
self.layer2gr=tk.Frame(self)
self.layer3=tk.Frame(self,pady=50)
self.layer1.pack()
self.layer2blue.pack()
self.layer2gr.pack()
self.layer3.pack(side="bottom")
self.valueLabel = tk.Label(self.layer1,text="Input Value :=>> ") # initalizing Label to display text
self.inputTextbox = tk.Entry(self.layer1) # initalizing textbox
self.inputTextbox.focus() # moving cusor
self.valueLabel.grid(row=0,column=0,padx=0) # defining grid layout for Components placement
self.inputTextbox.grid(row=0,column=1,padx=30)
self.req1 = tk.Label(self.layer1,text="Blue Commands require input")
self.req1.grid(row=1,column=0,pady=10)
# initalizing input requiring command
self.btn_ping = tk.Button(self.layer2blue, text="ping", command=self.cmd_ping,bg="blue")
self.btn_tracert = tk.Button(self.layer2blue, text="tracert", command=self.cmd_tracert,bg="blue")
self.btn_pathping = tk.Button(self.layer2blue, text="pathping", command=self.cmd_pathping,bg="blue")
# binding components to the frame by packing them in
self.btn_ping.pack(side="left",padx=5,pady=5)
self.btn_tracert.pack(side="left",padx=5,pady=5)
self.btn_pathping.pack(side="left",padx=5,pady=5)
self.req2 = tk.Label(self.layer1,text="Green Commands don't require input")
self.req2.grid(row=2,column=0,pady=10)
# initalizing input not requiring commands
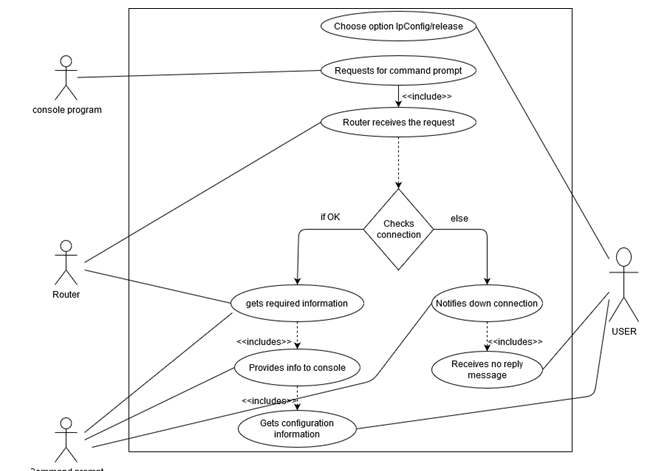
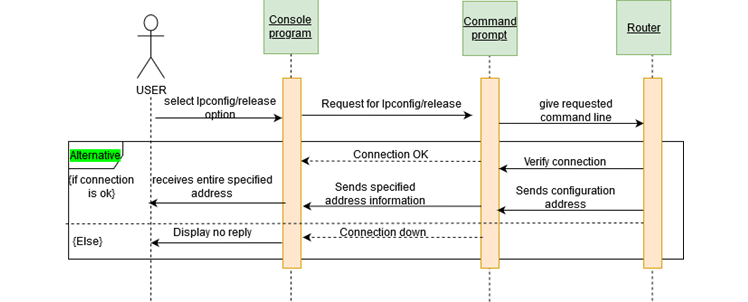
self.btn_ipconfig = tk.Button(self.layer2gr, text="ipconfig /all", command=self.cmd_ipconfig_all,bg="green")
self.btn_ipconfig_release = tk.Button(self.layer2gr, text="ipconfig /release", command=self.cmd_ipconfig_release,bg="green")
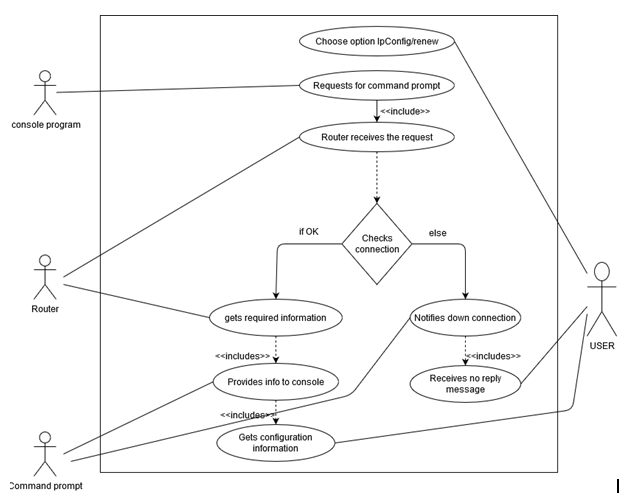
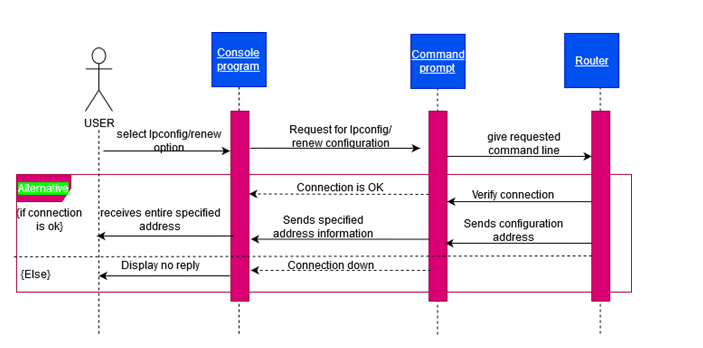
self.btn_ipconfig_renew = tk.Button(self.layer2gr, text="ipconfig /renew", command=self.cmd_ipconfig_renew,bg="green")
self.btn_netstat = tk.Button(self.layer2gr, text="netstat -an", command=self.cmd_netstat,bg="green")
self.btn_ipconfig.pack(side="left",padx=5)
self.btn_ipconfig_release.pack(side="left",padx=5)
self.btn_ipconfig_renew.pack(side="left",padx=5)
self.btn_netstat.pack(side="left",padx=5)
# defining Exit button for the application
self.exit = tk.Button(self.layer3, text="Exit Application", bg='red', command=self.main.destroy)
self.exit.pack(side="bottom",padx=10)
# function defination for all the network commands
def cmd_ping(self):


    value=self.inputTextbox.get()


    run_cmd = os.system('ping '+value)

    if run_cmd == 0:

        print("Ping Command Success")

    else:

        print("Ping Command Failure")


    self.inputTextbox.delete(0,'end')  # to clear out the text box after command is executed


def cmd_tracert(self):

    value=self.inputTextbox.get()

    run_cmd = os.system("tracert "+value)

    self.inputTextbox.delete(0,'end')


def cmd_pathping(self):

    value=self.inputTextbox.get()

    run_cmd = os.system("pathping "+value)

    self.inputTextbox.delete(0,'end')


def cmd_ipconfig_all(self):

    run_cmd = os.system("ipconfig /all")


def cmd_ipconfig_release(self):

    run_cmd = os.system("ipconfig /release")


def cmd_ipconfig_renew(self):

    run_cmd = os.system("ipconfig /renew")


def cmd_netstat(self):

    run_cmd = os.system("netstat -an")
root window instance creation
root = tk.Tk()
Network_Application class Instace creation
app = Network_Application(masterRoot=root)
Running the instance object in infinite loop
app.mainloop()
Individual project
Week 1
I’m reaching why the GP patient’s data record essential, because the doctor needs to look at the patient illness history and medication record to help the doctor to identify, which types of prescription to give to the patient.
Ingeneral, the patient data used to improving health care services, develop new medication and prevent the disease.
Week 2
In this week my reach will focus on the GP petient data security policy (the minimum requirement to protect the patient data to earn the patient trust) such as
login passoword
Encription data
Antivirus
backup data and the system updated
Also consider latest network hardware such as routes, or firewall implement the security command to reduce the risk of the malicious attack.
Week 3
I watched on you tube data protection training video by ICO, data day hygiene. They are strongly advise do not used memory stick to stored personal data , because it is easy to lost or misused unless the memory stick encrypted.
Also send personal data by fax without checking if the number was correct very high risk as well.
When you are sharing personal information with other organization must only information relevant the purpose and content should be disclosed.
furthermore, whey are explain how to dispose the personal information should be measured by appropriate technical, because If you are just deleted the hard drive that is not proper way and the data can be retrieve.
Week 4
Group project;
We had group project meeting during the session. the meeting focus individual task in the group project and we are scheduled time to handed individual task.
Individual project
Week 5
We had group project discuss the report tiles and setup Microsoft team to able to communicate essay 10 March 202
This is an example post, originally published as part of Blogging University. Enroll in one of our ten programs, and start your blog right.
You’re going to publish a post today. Don’t worry about how your blog looks. Don’t worry if you haven’t given it a name yet, or you’re feeling overwhelmed. Just click the “New Post” button, and tell us why you’re here.
Why do this?
Because it gives new readers context. What are you about? Why should they read your blog?
Because it will help you focus you own ideas about your blog and what you’d like to do with it.
The post can be short or long, a personal intro to your life or a bloggy mission statement, a manifesto for the future or a simple outline of your the types of things you hope to publish.
To help you get started, here are a few questions:
Why are you blogging publicly, rather than keeping a personal journal?
What topics do you think you’ll write about?
Who would you love to connect with via your blog?
If you blog successfully throughout the next year, what would you hope to have accomplished?
You’re not locked into any of this; one of the wonderful things about blogs is how they constantly evolve as we learn, grow, and interact with one another — but it’s good to know where and why you started, and articulating your goals may just give you a few other post ideas.
Can’t think how to get started? Just write the first thing that pops into your head. Anne Lamott, author of a book on writing we love, says that you need to give yourself permission to write a “crappy first draft”. Anne makes a great point — just start writing, and worry about editing it later.
When you’re ready to publish, give your post three to five tags that describe your blog’s focus — writing, photography, fiction, parenting, food, cars, movies, sports, whatever. These tags will help others who care about your topics find you in the Reader. Make sure one of the tags is “zerotohero,” so other new bloggers can find you, too.